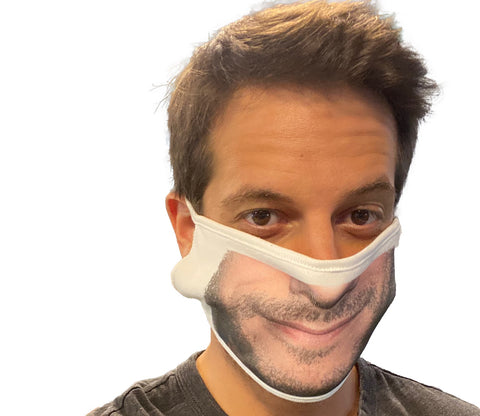
Printing Faces on Face Masks
Requirements
- Foto Master's photo booth software
- Foto Master’s Photoshop droplet
- Adobe Photoshop Software
- Foto Master’s preset
- Heat press machine
- Color laser printer for sublimation printing
- Transparent paper for your selected printer
Selecting the Right Printer
When it comes to the printer, you have 2 options:- Color laser printer using transfer paper
- Designed dye-sublimation printers (inkjet)
Selecting the Right Heat Press
We will use a 2-step operation to create a mask. First we will print on a transfer paper and then we will use a heat press to transfer the image onto the mask. The size of the mask that you'll choose will determine the heat press size required. The process of using your heat press on the mask depends on the material you are using and the heat press model itself. In this article we're demonstrating using a 6”x6” heat press. Here are the steps we take to transfer the image onto the mask:- Step 1: Open the heat press and raise the heat up to 180 degrees Celsius (356 Fahrenheit)
- Step 2: Put the mask on the tray and iron it for 7 to 10 seconds
- Step 3: Place the transfer paper with the printed face on top of the mask, make sure it’s positioned correctly
- Step 4: Put parchment paper on top of the print and press it for 20 seconds (time and heat depend on your heat press, fabric and transfer paper type)
- Step 5: After 20 seconds open the heat press and immediately but slowly separate the paper from the fabric
- Step 6: Put the mask on the tray facing up, and place the parchment paper on top of it. Close the heat press for additional 5 to 10 seconds. This will seal the picture.
- Step 7: Enjoy it!
Setting your Preset Up in Foto Master's photo booth software
- Step 1: Browse to the 'Layout' tab and set the layout size to the size of your color transfer paper, in our case, it’s an A4 paper size which is: 2480x3508 pixels
- Step 2: Measure your mass size and create an overlay with a hole that will represent the mask that you are using, you can use 1”=300px when you calculate how to create it for a 300dpi resolution. Load it as you would load any overlay on top of the DSLR photo visual element

- Step 3: After running a test, position the image correctly using the width/height/top/left settings in the layout. *Note that in our template the camera must be mounted horizontally (in landscape mode)
- Step 4: Create the same overlay but in black and add a face outline to it (you can use our provided example, but you can create your own template that will fit the product you’re using and desired face size best). Load it as an animation state in the workflow to appear on top of the live view

- Step 5: once the participant’s face is in position, trigger the next state with touch, a remote control or keyboard (you can also use a time trigger but we don’t recommend it). Use the zoom of your camera to capture a close up of the participant’s face and focus the camera.
- Step 6: In order to adjust the face to the mask and for it to look more realistic with the proper curve of the face, you will want to use the special droplet we created. The droplet.exe file is loaded as an external script in the workflow. Once the software reaches the droplet state, it will use Photoshop in the background and apply the following change to the photo:

- Step 7: Make sure to use the cute animation we provided to indicate to the guest that their mask is being prepared
Below you will find the example workflow:

Download our Sample Preset
Here are the steps to download our sample preset containing the droplet and assets- Step 1: Click here to download our sample preset and assets
- Step 2: Extract the “custom” folder from the Zip file and copy it into the “MirrorMeBooth” in C: Drive
- Step 3: Move the “Masks.xml” file (the preset) into the main “MirrorMeFolder
- Step 4: If the Foto Master photo booth software was open - close it and open it again

